Introduction
This article focuses on the application of the Cursor programming assistant in daily development, emphasizing its billing mechanism, tool invocation methods, dialogue management strategies, and Rules configuration. Based on the author’s practical experience, a methodology for effectively using Cursor and a guide to avoid pitfalls are summarized.
With the rapid development of AI programming assistance tools, Cursor has quickly become a favorite among developers due to its powerful interactive capabilities, deeply integrated Agent mode, and precise code understanding. However, as the user base grows and the complexity of features increases, it becomes clear that Cursor is not an “unlimited free” tool but rather an intelligent assistant that requires careful planning and efficient utilization.
Especially after the version 0.50 update, Cursor has unified its billing mechanism and introduced new features like MAX mode, presenting users with both enhanced capabilities and new challenges. This article systematically organizes a guide for developers based on the author’s frequent use of Cursor in actual projects.
Billing Model
The first important aspect is how Cursor charges. Many users mistakenly believe that after subscribing to a membership, they can use it indefinitely for free, leading to quickly exhausting their quota. Previously, Cursor’s billing was difficult to track, often resulting in exceeding costs. However, after the 0.50 version, Cursor has standardized its billing model, charging based on interaction counts for both Agent and chat modes. An interaction is counted each time you ask a question and receive a response. Each cycle includes 500 free interactions, and once this quota is exhausted, users must pay extra (approximately $0.15 per interaction) or switch to a slow mode, which is not a great experience.
Given this billing model, we should maximize the value of each session by having Cursor perform as many tasks as possible in one interaction, rather than simply asking a few questions.
Additionally, Cursor limits the use of tools to a maximum of 25 in a single interaction. For example, reading a file counts as one tool, and searching a folder counts as another. If the limit is exceeded, Cursor will require an additional interaction, consuming more of your quota. However, typical requests rarely exceed 25 tools, so extra requests are uncommon.
Using different models in Cursor incurs different costs:
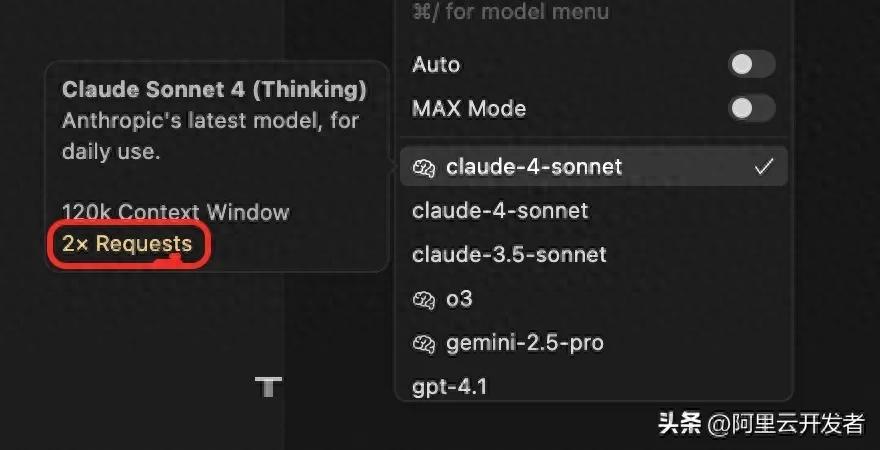
Opening the model selection box reveals the pricing for different models (last week this model was $0.75). For instance, using Claude for deep thinking counts as two interactions for one response. Therefore, it is advisable to choose models based on your needs; Cursor defaults to auto-selecting models but selecting the latest version of Claude is generally recommended. The distinction in deep thinking may not be significant.
Lastly, a brief introduction to Cursor’s MAX mode can be understood as Cursor’s super Saiyan mode, supporting larger contexts and removing the 25-tool limit, increasing the number of lines read from files. However, the pricing is significantly higher; MAX mode does not simply charge based on interaction counts but directly uses the cost of the large model. Cursor takes a 20% service fee, but the billing method still reflects interaction counts, meaning that even a single interaction might be calculated as multiple interactions based on token usage. In one afternoon using MAX mode, I consumed over 300 interaction counts while writing an MCP tool before the billing reset.
You can check your current monthly usage and reset time at the billing dashboard: https://www.cursor.com/cn/dashboard. Regularly monitor this to avoid exceeding usage limits that could impact your experience.

Cursor Tools
Next, I will share how to use tools in Cursor, which can be manually specified to enhance your experience.
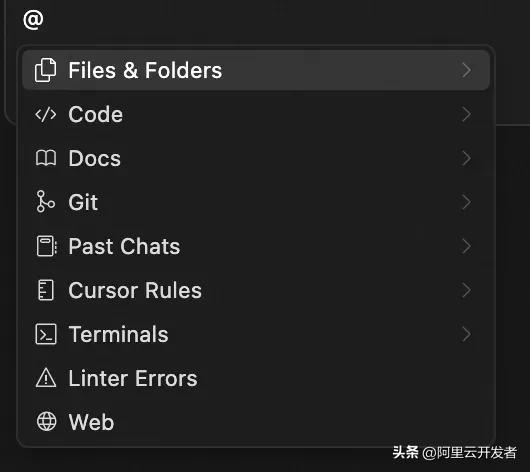
In dialogues, you can manually specify tools using @, with the following capabilities:
- files&folders: Read files and folders, allowing Cursor to focus on specific files.
- docs: Specify documents for Cursor to read; if the document link ends with a /, Cursor will read all web pages under that link, suitable for reading development documentation.
- git: Read git commits and compare commit content, though this is used less frequently.
- past chat: Analyze previous conversations and incorporate them into the current context.
- cursor rules: The rules for Cursor, which will be discussed in detail later and are generally not used in chat.
- terminals: If a command fails in the terminal, you can inform Cursor of the terminal to help resolve it.
- linter errors: Code style errors, typically not used.
- web: Request Cursor to search online before interacting, generally not used.
Tips for Using Cursor
Multiple Dialogues (Optimized in New Version)
In daily agent use, clicking the plus sign in the upper right to open a new window will pause the current workflow.

This leads to a poor experience and wasted interaction counts. However, Cursor supports running dialogue boxes in the background. You can use ctrl (command) + T to open a new dialogue box.

These three dialogue boxes operate independently, allowing each to run tasks without interruption. My suggestion is to open three tabs each time instead of using the plus sign in the upper right to avoid disrupting workflows and information.
Interrupting Dialogues
In agent mode, AI performance may not meet expectations. Instead of regenerating responses, which wastes time, Cursor supports interrupting the context. If you find that most generated files do not meet expectations, you can reset to a checkpoint. If most are correct but only a small portion is incorrect, you can interrupt in the dialogue box before the erroneous generation.
Click the plus sign here to enter a new description, save the modifications above, and roll back subsequent changes to continue generating.
Single Responsibility Principle
When using Cursor, we should ensure that each dialogue box focuses on one task. For example, if you need to develop a simple requirement, that requirement can be treated as a single dialogue box to complete all functions. However, for more complex requirements, try to break them down into smaller tasks and use different dialogue boxes to complete them.
In normal mode, Cursor’s context is limited, and due to the hallucination issues of large models, longer contexts can exacerbate hallucinations. Therefore, we should keep the context of dialogue boxes concise to avoid hallucinations that prevent task completion.
Note that our single responsibility refers to the entire dialogue box, not a single interaction. In each interaction, we should still aim to complete multiple related tasks rather than combining unrelated tasks into one session, which would negatively impact Cursor’s performance.
Task Decomposition
When using Cursor to fulfill a requirement, clearly describe your requests rather than summarizing them in one sentence. You need to express your context more clearly to avoid misunderstandings by the large model that could waste development time.
For instance, if your requirement is to implement a review system, do not simply say to implement a review system. Instead, break down the requirement into a series of tasks listed in order, such as:
- Use Evaluation as the review entity;
- Create Evaluation DTO as a transfer class and provide a Convert tool;
- Use itemId in Evaluation to associate with product id;
- Create EvaluationFacade interface as the exposure interface;
- EvaluationFacade needs to implement user review (user id, review content, product id) and delete review (user id, review id) capabilities;
- Create EvaluationFacadeImpl to implement EvaluationFacade;
- Ensure a user can only review a product once;
- …….
This way, you break down a specific requirement into tasks for Cursor to complete, rather than pasting a single sentence request, which enhances the AI’s efficiency in fulfilling your requirement.
Dialogue Referencing
Cursor does not remember your previous requests. When you have a new requirement that requires code used in previous interactions, if you directly ask Cursor to retrieve it, it may misinterpret or, in some cases, if a prior dialogue has already produced hallucinations, you need to open a new dialogue but do not want to repeat previous discussions. You can use the @past chats feature in Cursor to reference earlier dialogues. The large model will summarize that dialogue and include the summary in the current context, helping it better understand your previous discussions and improving task completion rates.
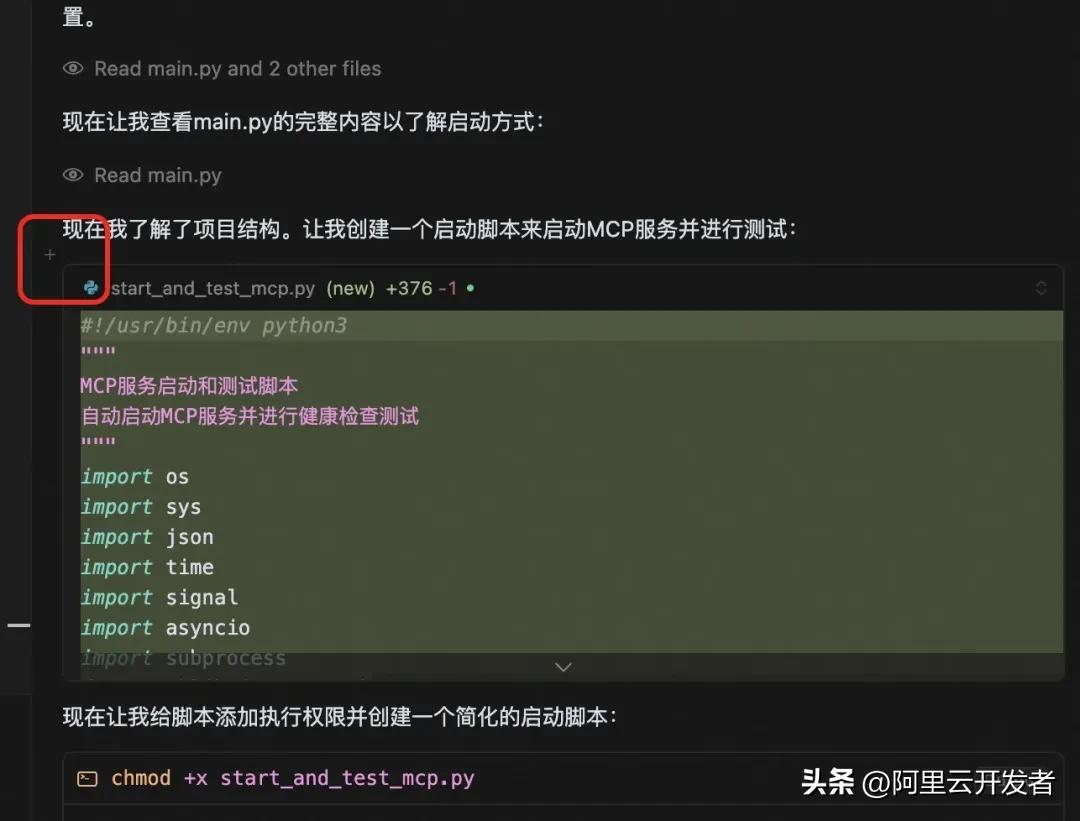
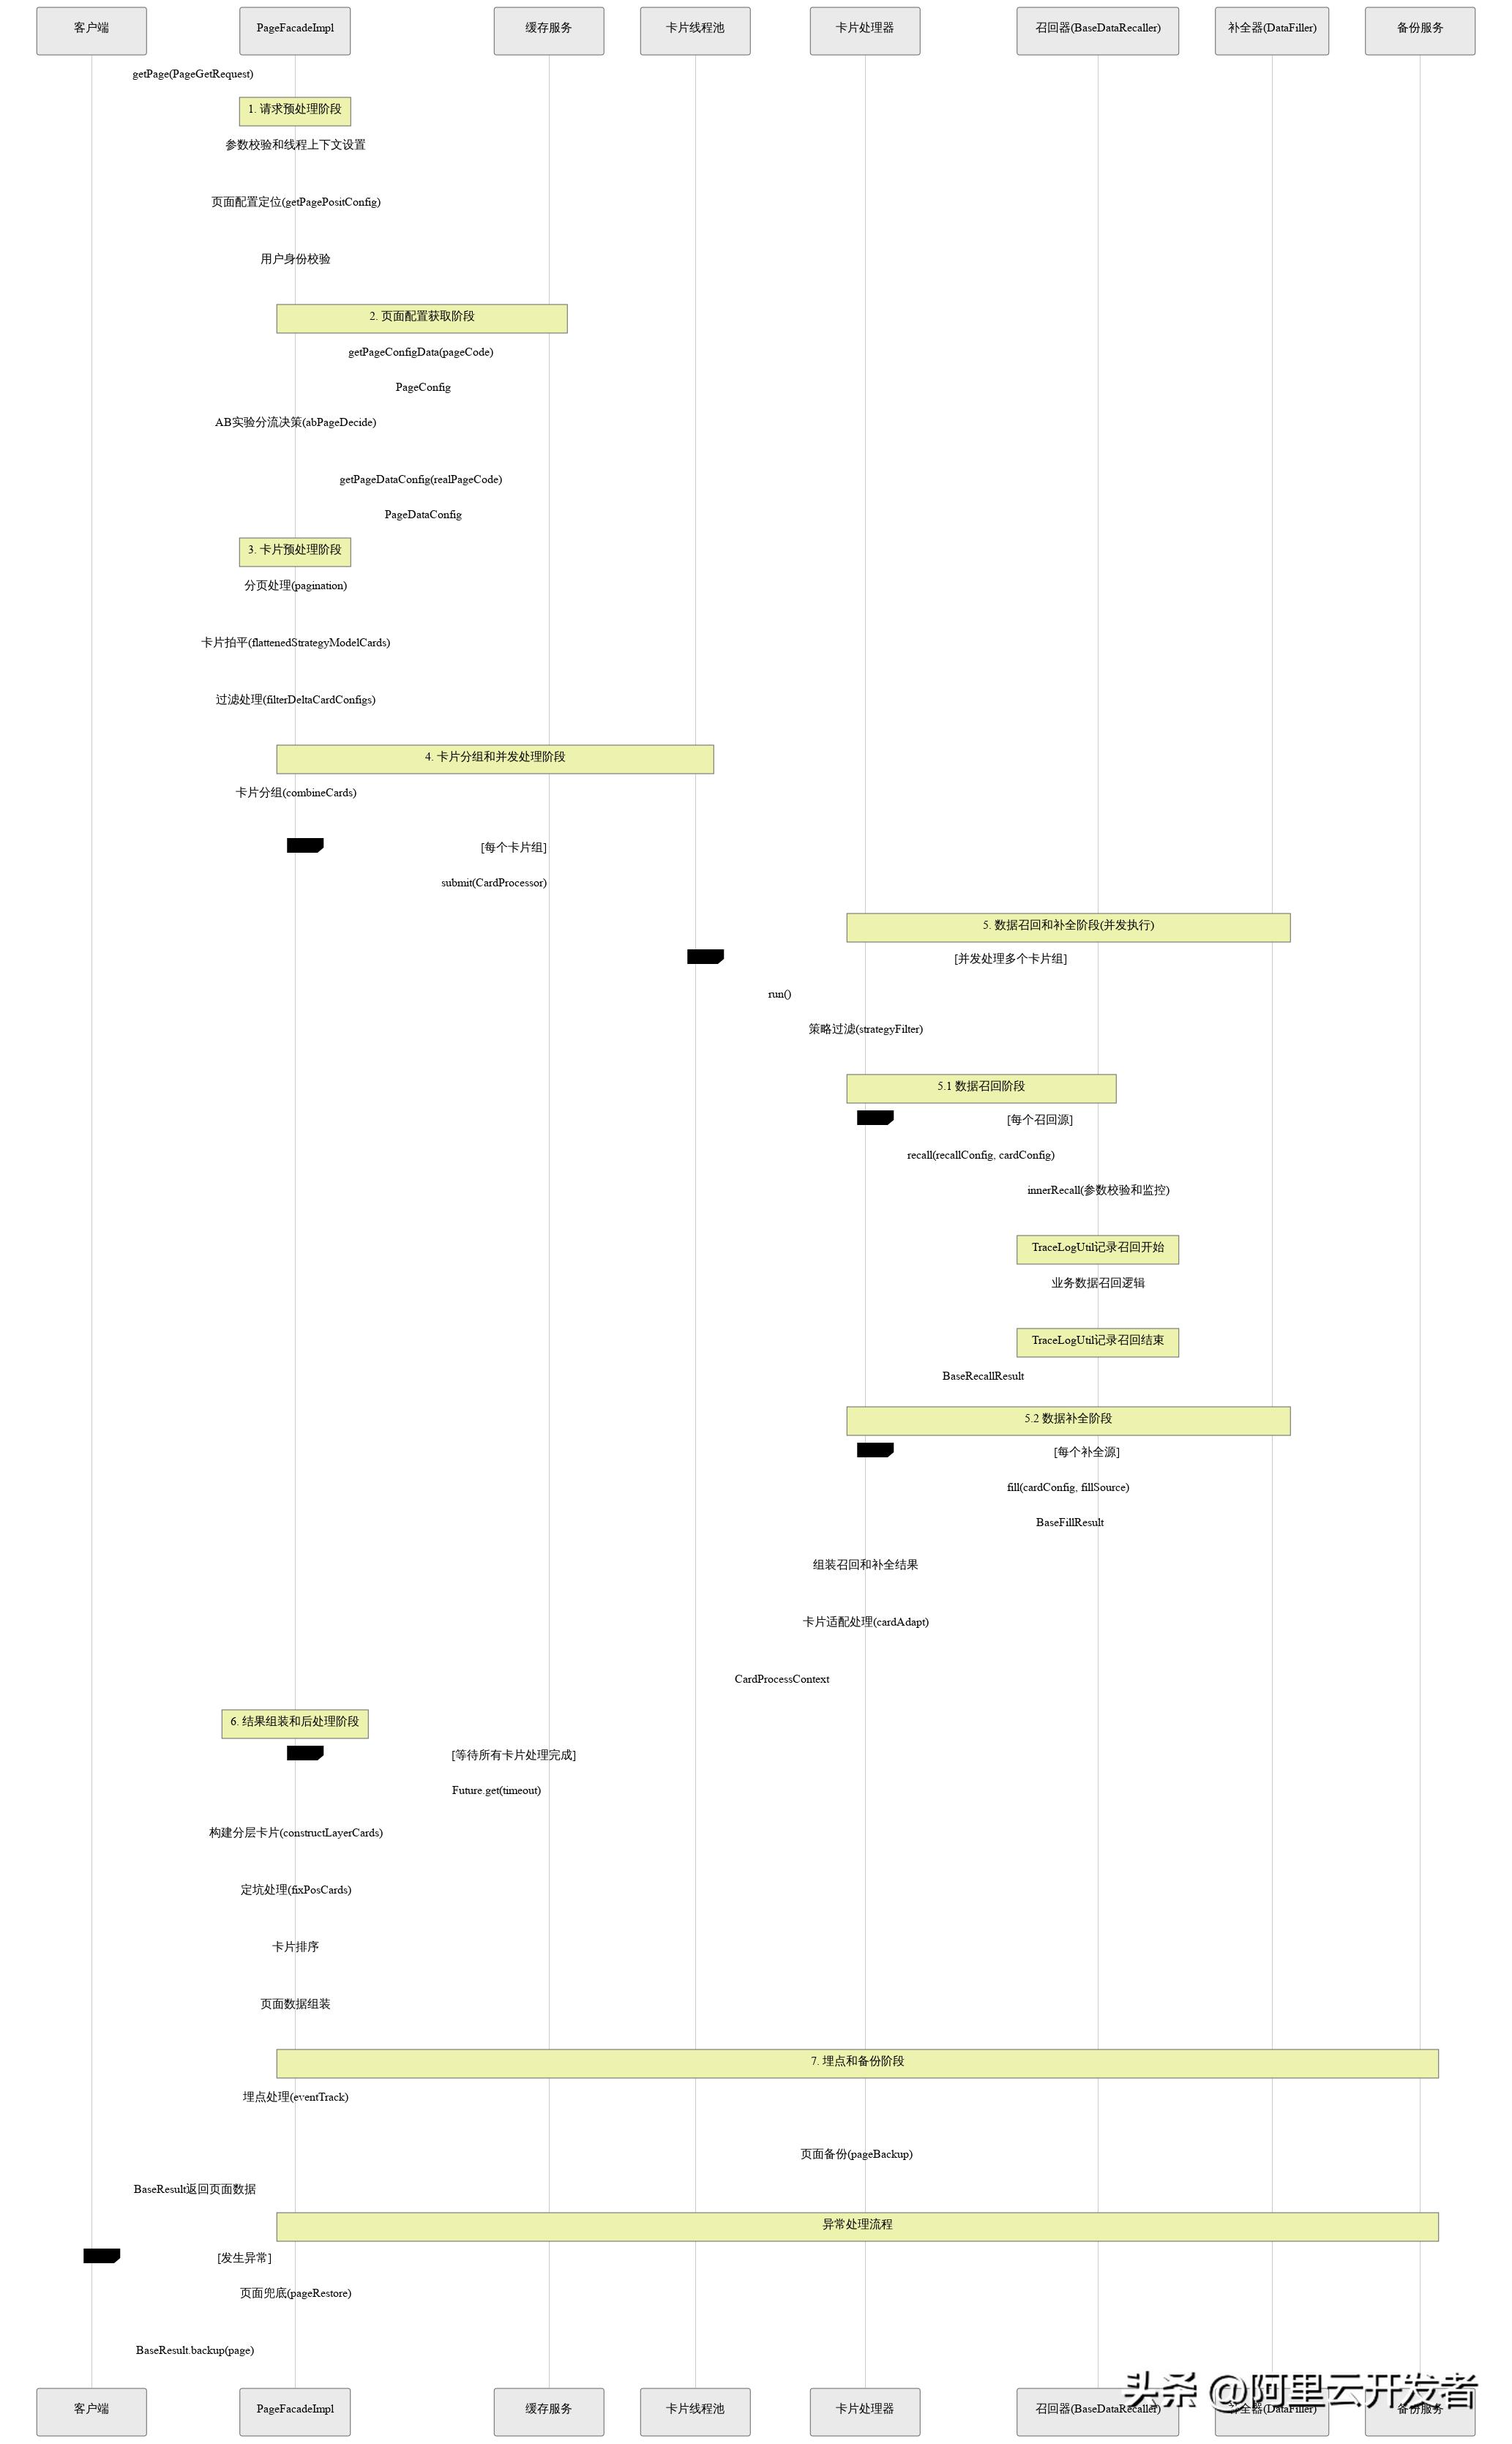
Diagram + Summary Capability (Reporting Tool!!!)
After using Cursor to complete a requirement, you can ask it to summarize the workflow or sequence diagram based on the completed requirement, outputting in PlantUML or Mermaid format to a file. This can be showcased using Yuque’s text drawing feature for better documentation and can also be directly given back to Cursor to inform it how a certain function was implemented.
Cursor Rules
Cursor rules are, in my opinion, the most critical feature of Cursor and the most effective way to enhance its efficiency. Let’s briefly introduce what Cursor rules are.
Cursor rules are the guidelines that Cursor must follow, meaning all conversations and code generation are based on these rules. You can think of them as the system context for the large model. There are no universally applicable rules, as standard coding conventions like the “Alibaba Code Development Specification” are already included in the large model’s knowledge base. Cursor rules are entirely based on your project or personal development guidelines. Creating appropriate rules can significantly enhance your development efficiency.
Cursor rules are divided into user rules and project rules. As the names suggest, user rules pertain to your personal development guidelines, while project rules relate to the project’s development rules. You can view all rules in the preferences -> Cursor settings.
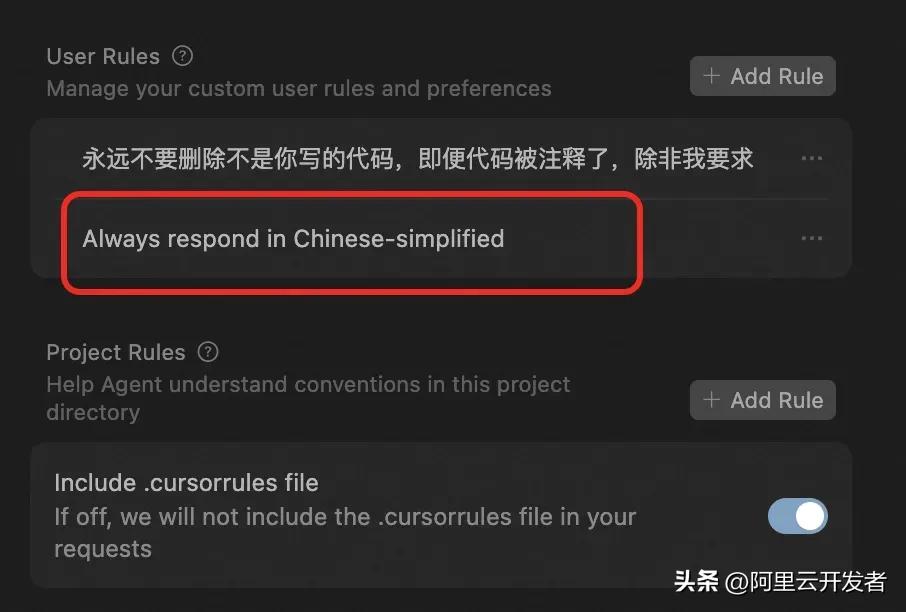
In user rules, there is a default rule to standardize the language of the large model’s responses. Other rules can be added via the add rule button in the upper right.
Project rules are relatively complex. In previous versions, Cursor could only use the .cursorrules file in the root directory to standardize Cursor rules, which limited us to including only a few rules in that file. In recent versions, Cursor has optimized this capability, allowing us to create multiple rules for a project that all team members can use.
Creating project rules is similar to user rules. Below the user rules section, you can create project rules and toggle whether to use the rules from the .cursorrules file.
Clicking the add rule button for project rules will prompt you to name the rule and provide detailed content.
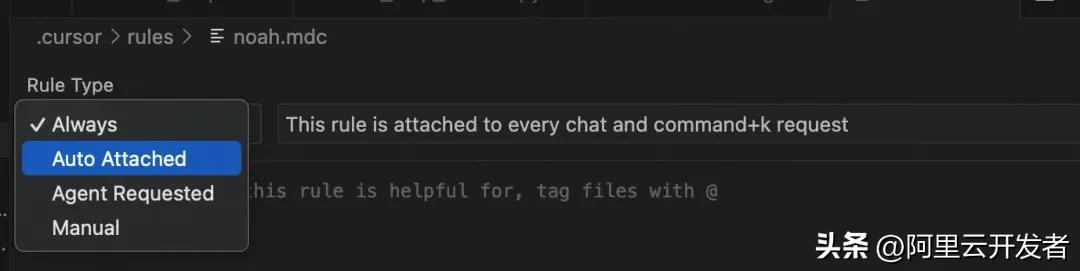
Once created, a .mdc file will be generated, which is an extension of the markdown format. You can write it in markdown format. The rule type on the left indicates the type of this rule, which mainly falls into four categories:
- always: Rules that will always be used;
- auto attached: Rules matched using regular expressions, such as file extensions, formats, specific folders, etc.;

- agent requested: Scenarios where the large model determines whether to invoke the rule;
- manual: Rules that the agent will never invoke unless specified manually (rarely used);
You can create different types of Cursor rules based on your needs.
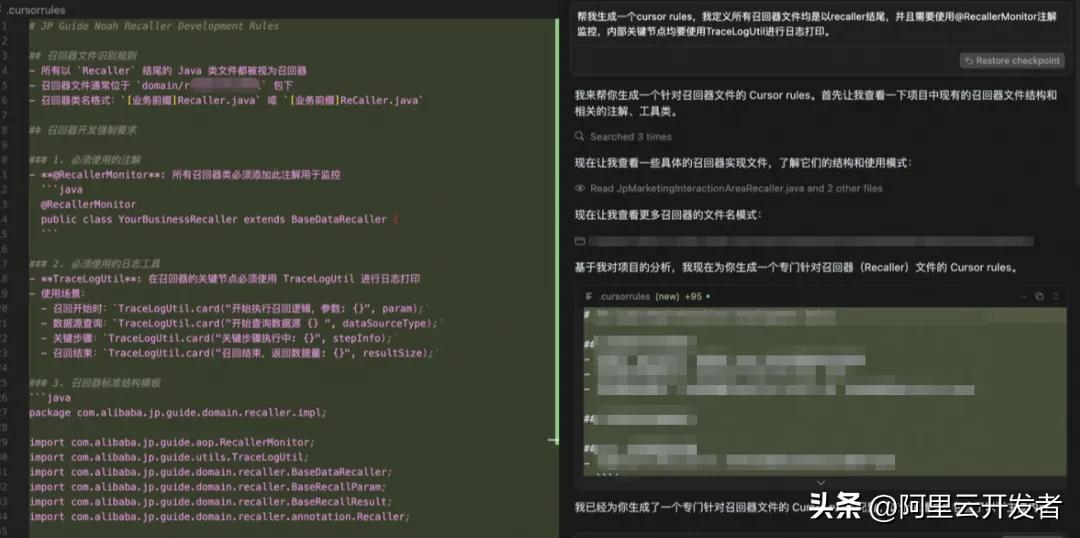
You can ask Cursor to help you write the specific content of the rules. For instance, if there are some development specifications in scheduled tasks, you can ask Cursor to summarize the commonalities in each scheduled task to create a Cursor rule. Alternatively, you can state some simple rules, and Cursor will write a complete rule based on your code context.
When should you consider modifying Cursor rules? In my experience, if you find yourself repeatedly emphasizing a certain rule during development, it may be time to summarize it into a Cursor rule.
Pitfalls of Cursor
Cursor Cannot Read JAR Files
Cursor cannot accurately determine interfaces within JAR files. Therefore, when creating RPCs, be explicit about the methods to call and the response results, and clarify which fields to use. Otherwise, Cursor may use Object as the response result and rely on reflection to generate useless code. You can also create Cursor rules to standardize RPC calls.
Cursor May Cut Corners
When solving problems, if Cursor tries multiple times without success, it may attempt to cover up the issue. For example, if a validation script fails, after two unsuccessful attempts to resolve it, Cursor might modify the validation script to make it appear successful. Therefore, when trying to resolve issues with Cursor, ensure it does not modify the validation scripts, and consider creating a rule for this.
Use Checkpoints Cautiously
In Cursor dialogues, a checkpoint is retained before each session. If the generation is unsatisfactory, Cursor will roll back to the checkpoint’s style. However, multiple interactions or sessions can lead to checkpoint instability. Therefore, it is advisable to use version control tools and only utilize checkpoint rollbacks within single sessions.
Verify Cursor Modifications Carefully
Always verify the scope of changes made by Cursor before submitting code. Do not submit directly after modifications, as Cursor may alter unintended code, potentially leading to unexpected bugs.
Comments
Discussion is powered by Giscus (GitHub Discussions). Add
repo,repoID,category, andcategoryIDunder[params.comments.giscus]inhugo.tomlusing the values from the Giscus setup tool.